Wow! This carrot cake blew up on my Instagram so I wanted to share the recipe and how I made those little flowers. The recipe belongs to Danielle at Live Well Bake Often
For me to share a baking recipe is rare, my baking skills are not that refined and I usually don’t have the patients for elaborate decorating. So I was pleasantly surprised when this cake not only tasted great but turned out pretty cute too!
How To Make Carrot Flowers
*Photo’s coming soon
- You will need 3 colors of carrots, or you could use parsnips too.
- using a peeler make thin slices down the carrot. Do not press hard, keep ribbons as thin as possible.
- When making ribbons you’ll notice that one side is thinner than the other. This is what you want, it’s that thin side that will give the flowers a delicate look. Do not worry if the ribbons are different widths, you want irregularity.
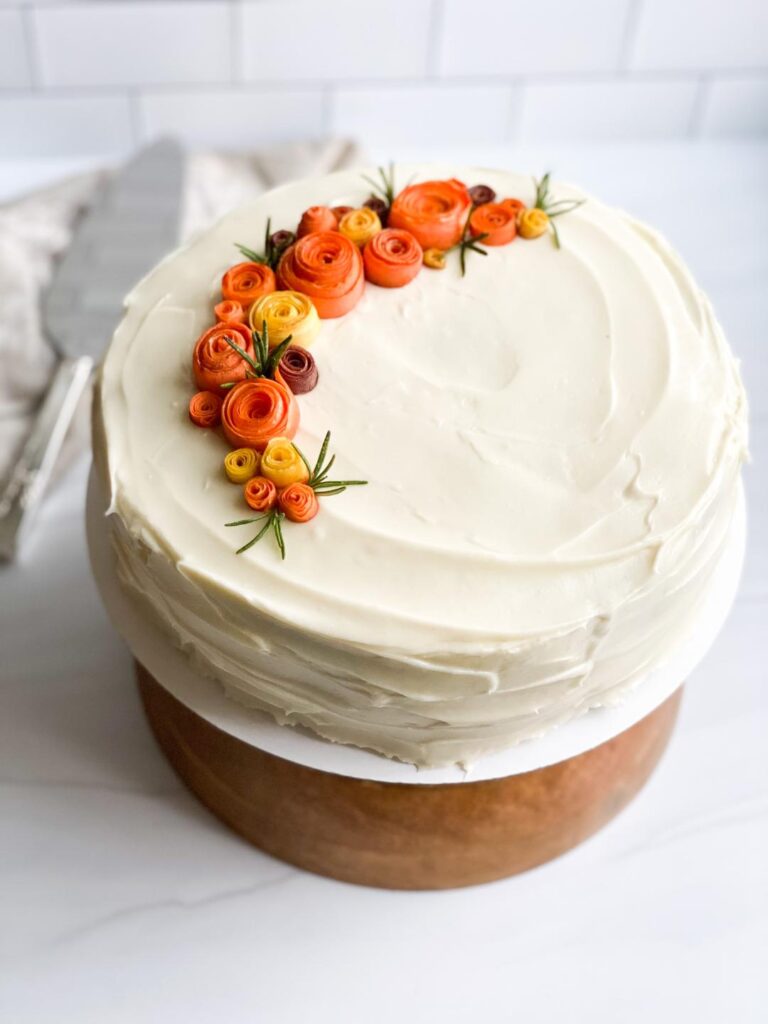
- Starting with a small ribbon roll it up tightly. Keep adding more ribbons until you get to the desired width and height. Keep the thin edge of the ribbon facing the top as you add layers.
- Once you have reached the size flower you want secure with a toothpick.
- Place flowers on your finished cake. I used rosemary from my garden to add in a little green.

Carrot Cake with Carrot Flowers
Ingredients
Scale
For the cake:
- 2 cups all-purpose flour (spooned & leveled)
- 2 teaspoons baking powder
- 1 teaspoon baking soda
- 1 + 1/2 teaspoons ground cinnamon
- 1/2 teaspoon ground ginger
- 1/4 teaspoon ground nutmeg
- 1/2 teaspoon salt
- 3/4 cup canola or vegetable oil
- 4 large eggs room temperature
- 1 and 1/2 cups brown sugar
- 1/2 cup granulated sugar
- 1/2 cup unsweetened applesauce
- 1 teaspoon pure vanilla extract
- 3 cups grated carrots, lightly packed
For the cream cheese frosting:
- 2 (8-ounce) package (brick style) cream cheese, softened to room temperature
- 3/4 cup unsalted butter, room temperature
- 4 cups powdered sugar
- 2 teaspoon pure vanilla extract
Instructions
To make the carrot cake:
-
Preheat oven to 350°F (177°C). Spray two 9-inch round cake pans well with non-stick cooking spray (you can also line the bottom of each pan with parchment paper for easier removal) and set aside.
-
In a large mixing bowl, whisk together the flour, baking powder, baking soda, cinnamon, ginger, nutmeg, and salt until well combined. Set aside.
-
In a separate large mixing bowl, whisk together the oil, eggs, brown sugar, granulated sugar, applesauce, and vanilla extract until fully combined. Add the grated carrots into the wet ingredients and mix until well combined.
-
Pour the wet ingredients into the dry ingredients and mix with a whisk or rubber spatula until just combined, making sure not to over mix the batter.
-
Pour the cake batter evenly between both prepared cake pans. Bake at 350°F for 30-35 minutes or until the tops of the cakes are set and a toothpick inserted into the center of each one comes out clean. Remove from the oven, transfer to a wire rack, and allow to cool in the pans for about 20-25 minutes. Once the cakes have cooled, remove from the pans and return the cakes to the wire rack to finish cooling.
To make the cream cheese frosting:
-
In the bowl of a stand mixer fitted with the paddle attachment, or in a large mixing bowl using a hand-held mixer, beat the cream cheese until smooth. Add the butter and mix for about 30 seconds-1 minute until well combined and smooth. Add in the powdered sugar and vanilla extract and continue mixing until fully combined, scraping down the sides of the bowl as needed.
To assemble the cake:
-
Level the tops of each cake with a knife. Place one of the cakes on a cake stand, top with a little over 1/2 cup of the frosting, and smooth it out into one even layer. Place the other cake on top and use the remaining frosting to frost the top and sides of the cake. Top with pecans or other toppings of choice if desired.
I will review my 4 🌟 rating when I am finished. As of now cake is baking the rating i gave was for a well written, easy to follow recipe. It smells wonderful!!!! My batter was thin i am wondering if I messed up somewhere or is it supposed to be that way?
★★★★
Wonderful cake! I made 2 changes 1st I made pineapple filling ,2nd I candied the carrots which turned out beautifully! Thank you for sharing.
★★★★★
WOO HOO! I am so glad to hear it turned out and I love the change-up you did with the pineapple. I will have to remember that for the next time! And YES, candied carrots are sooo good, another great call! Thank you again for using my recipe and visiting my blog, It means the world to me! I hope you have a great week!
How did you candy the carrots? It seems like a great idea
Hi Maggie, thank you for stopping by my blog! I didn’t actually candy the carrots. I used a peeler and made very thin slices then wrapped the slices around a toothpick until I got to the size of the carrot flower I wanted. I then secured the carrot with a tooth pick over night so it would hold its shape! Hope that helps! Thank you again!
Hi there, how do you candy the carrots please?
I made this cake twice now. Once for a wedding then now for their first child’s first birthday. Fabulous recipe.
Good Morning Marion! Thank you for stopping by my food blog and making a recipe!
The carrots aren’t actually candied at all. ☺️ I shave different color carrots into very thin ribbons then roll them (tightly) until I get to the desired size of the flower. Secure with a toothpick overnight. By the next day they should hold their shape…it’s a tedious process and they don’t all turn out (sadly) so make several to ensure you have enough to decorate.
There are a few more details instructions on this page above the recipe card!
Thank you again! Good luck! Let me know how they turn out!
Hi Dee! So sorry for the delay in responding! I’m still getting the hang of these comments and notifications not going to my spam! But yes, the batter is a bit thin. Thank you so much for trying my recipe, I really appreciate it so very much!
Where do you secure the toothpick to on the carrot flowers?
Hi there! I am sorry for the delay in response, I was having a bit of trouble with my PC. After I wrap the carrot slices to the desired width I will use the toothpick to hold the final wrap in place. You won’t need to push it in very far at all to get it to hold. I made the flowers the day before I needed them, by the next morning I could remove the toothpick the carrot would stay wrapped tight. Let me know if that helps or if you have any additional questions! And thank you so much for visiting my blog and checking out my recipe, I appreciate you very much!
This is beautiful. Did you candy the carrot flowers or are they just shaved carrots??
Hi there! I am so sorry for the delay in response – I was having a bit of trouble with my PC. I did not candy the carrots I just peeled them very thin, the thinner you can get the better and more delicate they look. Slicing them then will also allow you to wrap them tightly without cracking. I hope that helps and feel free to reach out if you have any additional questions. Thank you so much for checking out my blog and recipe, I very much appreciate you!!
Awesome awesome awesome recipe. Best carrot cake I’ve ever made (super moist and perfect texture AND baked nice and flat just using my cake strips). The flowers are surprisingly easy to make, I couldn’t find multi coloured carrots so I used carrots, parsnip and beets, and just boiled them in sugar water to soften for a bit (after peeling). Thanks!!
★★★★★
AWWW!! YAY! I love love love everything about this, I am so happy you liked the carrot cake – it is by far the most popular cake I make! And that was so creative using the alternate vegetables, I would love to see a picture if you happen to take one, I bet the dark color of the beets made the arrangement so beautiful! Thank you so very much for visiting my blog and trusting me for your cake baking needs, you have truly made my day and I appreciate you taking the time to leave such a thoughtful review and tell me about your experience. This is invaluable information and I am so appreciative. Thank you again and have a week!
I did! I will send an email with some photos 🙂 (can’t share in a comment)
★★★★★
This recipe is awesome! Best frosting I’ve ever made! I didn’t need toothpicks for the roses they held their shape just pushing them into the icing after I let it harden in the refrigerator. I did have to ice it initially very loosely then refrigerate and smoothe it to make it look nice because it was quite wet to style. I wish I could add a pic!
★★★★★
Hi Sara – thank you so much for visiting my blog and trying a recipe! Your feedback means the world to me, I apologize for the delay in response. Life has pulled me away from food blogging for a bit but it’s no reflection on how appreciative I am you chose one of my recipes. I hope you have a great weekend! Krista
Hi!
I’m having issues assembling the flowers. I can roll up the roses but when I try to secure them with a toothpick, they crack. Any tips or updates on the procedure?
Hi there! Thank you so much for visiting my food blog and trying one of my recipes! The trick is getting the carrot strips as thin as possible – barely press down on the peeler. Too thick and they won’t want to bend. Also, keep the strips in water, if they get too dry they are also likely to crack. It definitely takes a few times practicing! Good luck and let me know how it turns out! Thank you again!
How long before you want to serve the cake can you make the roses and decorate it? Will the carrots stain the icing?
So sorry for the delay…my notifications don’t always come thru! I made the roses the day before and secured them with the tip of a toothpick. Keeping them overnight in the shape helps hold them when you remove the toothpick.
If the carrots are dry, they shouldn’t fadetoo much (if any) for one day. Hope they turned out ok for you!
Delicious and beautiful. I made 3 layers and used 1/2 cup of crushed pineapple in place of the applesauce and added raisins. I put a pineapple sauce between one of the layers. My roses were unwinding when I removed the toothpicks, so I just snipped the toothpicks off and gave fair warning to my guests (I don’t think anyone planned on eating the roses anyway!)
★★★★★
Hello Terry! Thank you so much for stopping my blog and leaving a comment! I’m so glad to hear you liked the carrot cake! I love your pineapple swap, I’ll have to give that a try!